As many of you noticed, I've been silent for a while. I'm sorry. Life took a downward turn. It's not too bad, but it is taking time for us to fix things. This also leaves me withint internet a good portion of the time or too busy to sit down and do a post.
We're trying to move, but we're in transition and staying in a tiny trailer on the family farm. It's chaotic.
That being said, I have an event to distract me this weekend.
Seadogs in Lebanon Or.
I'll have a few new things this weekend.
There will also be many dragons. I wish I could have made more ,but this is it for now.
For Dystopia Rising, sometimes a list of requested donations goes out. On that list this time was a request for horn that were light and big. You can defintely buy these, but sometimes the directors put things on the list for people to make.
One of the marshals who runs the costume area made a comment I couldn't ignore even though I'm trying not to take on crazy amounts of work right now. :P
Anyway, I sat down and fiddled around a bit. I wanted to make these as simply and cheaply as possible. D.R. already costs a ton to play.
What you'll need:
Toilet rolls tubes or any type or rolled tubes
Tape
Scissors
Modge Podge
Paper Towels
I started but cutting down the rolls into strips or roll. Once I had enough I began building the horns. This is a lot like putting togeather a puzzel but you sometimes have to modify the pieces so they'll fit inside each tube. Use the tape to connect your card board strips into smaller circles as you make the point. Just keep fitting them into eachother at an angle and curling the horn till you get a shape you like. Something like this first picture.
Once you're happy with the shape you can move onto the covering phase. You can't just jump right to painting as the card board will have huge gaps. By covering it with something like paper towel it'll fill in those gaps fairly well and give you a nice texture on the horns. I layed down a layer of modgepodge first. Then applied the torn up paper towels to the wet spot and covered that with more Modge Podge. I didn't repeat the whole layering here, but I'd recommend doing that just to make the horns stronger. Ttap the wet paper towel down into the rings a bit to accentuate the horn spirals a bit as you go. You'll have to let this dry over night before moving on to painting. Don't worry about the messy base yet. We'll get to that later. here they are with the modge podge all done.
Here's a pic of them after they've dried and had their first layer of paint. It's at this point you can get a bit fancy with the painting. Drybrushing, inking, etc. I just did a layer of brown for now. The right pic is them dry. YOu can see a bit of texturing and color splotching already.
This last part, connecting them to something, is always the hardest. I generally just use elastic. Just make sure you use a color that would disappear into your hair. This part is easy. Make a hole then add elastic. If you don't want them to move around much add knots on each side of the horn. Make sure you have them where you want them on your head.
Other ideas are to attach them to head bands. Or to use screws into wigs. etc.
As always have fun. if you have questions feel free to ask.
This guy just poped out of nowhere. I was mostly just playing with clay, trying to get rid of that brawn. No matter how much of it I use it just doesn't depreciate lol.
Overall he's cute, but I might do more painted detailing on him.
Things are quite hectic here as usual. We've been hunting for a home quite hevily and finally, hopefully found one.
*crosses fingers*
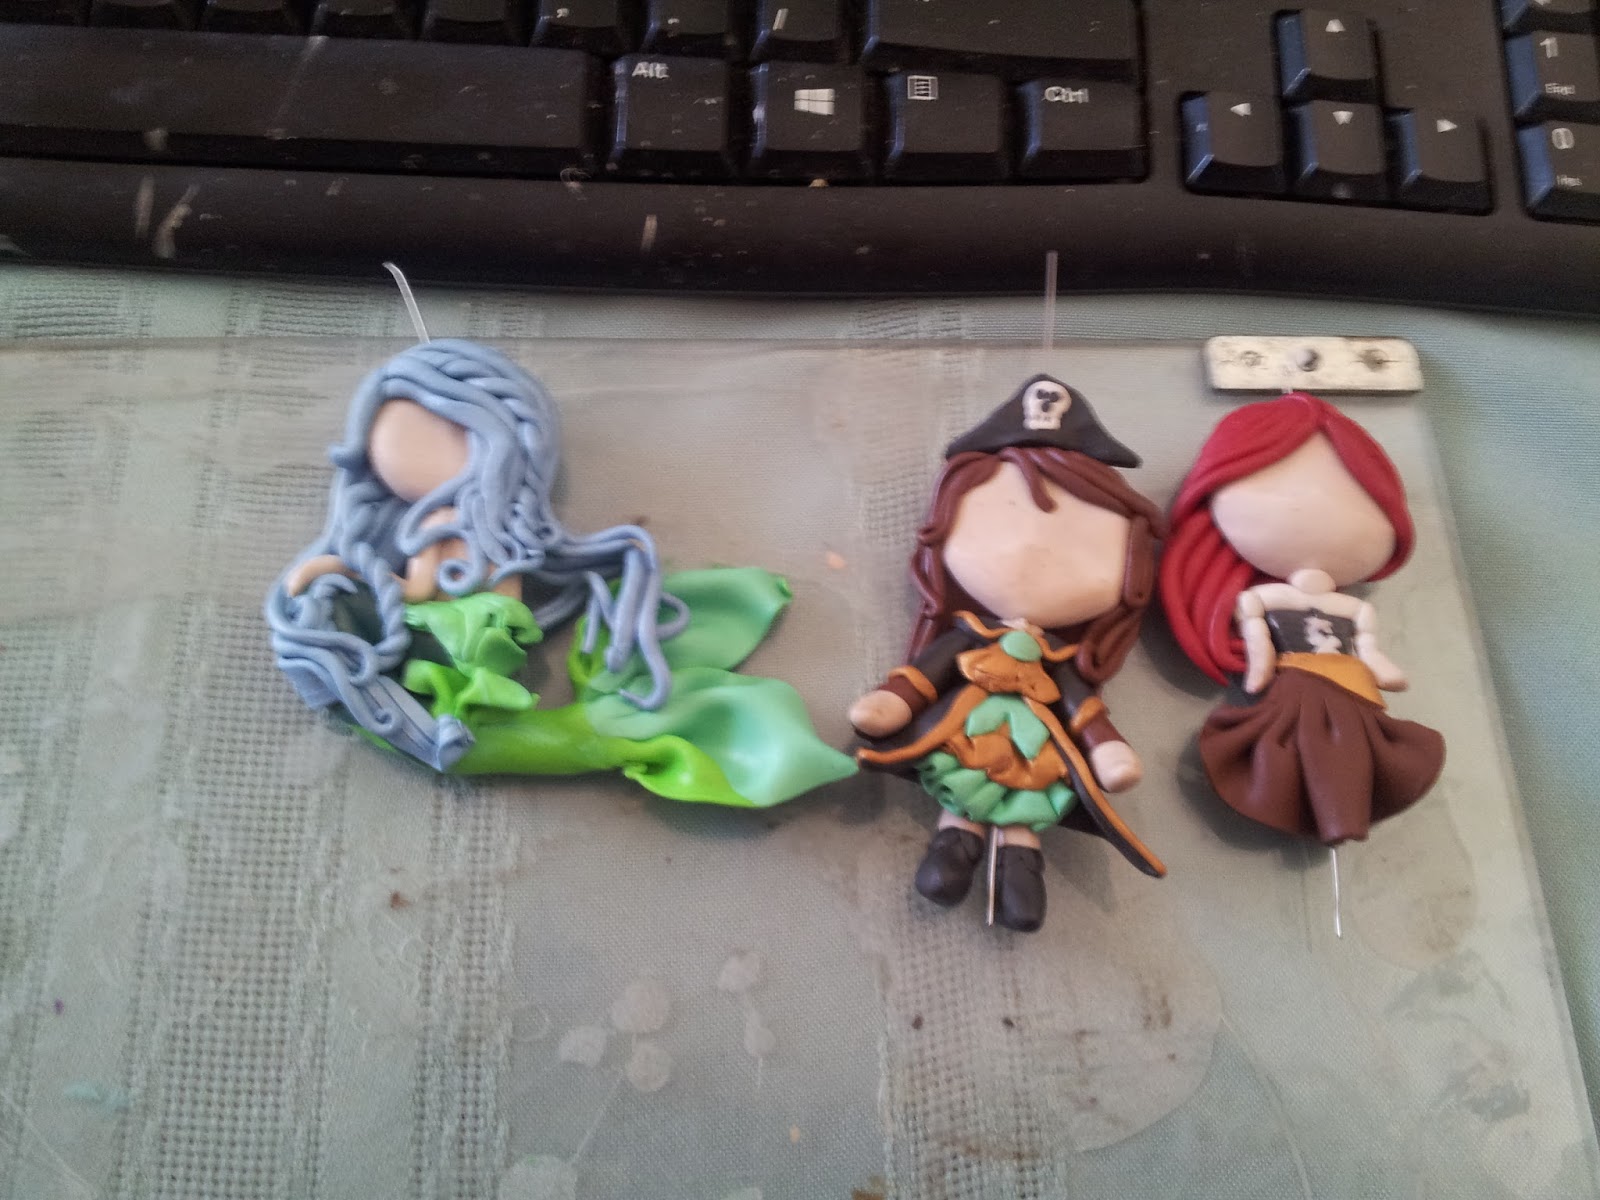
In the mean time. I've been trying to get refocused for Seadogs in July. To do that I've been making another series of dragons. Little pirate dragons.
The links to some tutorials on how I started are in this blog post: https://www.blogger.com/blogger.g?blogID=8755801839259003474#editor/target=post;postID=3842668546627630216;onPublishedMenu=allposts;onClosedMenu=allposts;postNum=39;src=postname
Recently I was gearing up for a local convention, Cherry City Comic Con. I was very excited to go, but the con, from it's beginning, has had issues.
A simple search brings up many posts about last year. Still I had many friends go and do very well as vendors so my friend and writer over at http://octokittycrafts.blogspot.com/ talked me into going this year. We were going to do both of the eventsthe coordinator had set up, the craft fair and the con. We were both looking forward to them as well.
A week before the craft fair was scheduled we got a message saying it was cancelled. Unfortunately, I didn't screen grab any of that. I had a hunch we should have exited stage left at that point, but I really wanted to do a con and a home one is very good for us so I stuck to it with my friend and waited.
And waited.
And waited.
Eventually we discovered this up on the Cherry City page. Mark has a tendency ot promise many things it seems, but never comes through with them. It is quite possible he's having trouble. Paypal isn't always easy to work with. If enough claims are made it does lock down, but still this was rediculous. Apparently some vendors received refunds, but only half for the craft fair. Others hung on for the con.
Anyway, my friend who paid for both events, and i paid through her, never got a refund for the craft fair from the guy. Its possible he only gave refunds to a few people, but no one's confirmed anything. She was far more accepting and friendly to him than I would have been through this whole situation.
Anyway, we kept working and planning in the hopes of making the loss up at the con.
You know where this is going don't you, dear reader?
Yep. It collapsed too.
Of course, just like last time, No one ever got the mentioned refunds.
Then this post went up which led to his rampage and attack on a personal friend before ripping all the posts and links down soon after:
http://koin.com/2014/12/29/vendor-from-canceled-craft-fair-wants-refund/
"Cherry City Comic Con is dead. A big thank you to those who sought to have it end. Your wish has been granted. After watching the farce that was the news I contacted the interested buyer and told him what happened and after his conversation with his business partners we both agreed that there was no coming back after the ignorant reporting done by Tim Becker who didn't contact me till 11am today offering me "a chance to respond, and if possible sit down for a quick interview with me to explain what the situation is." which is a little fucking retarded to air a story without all the facts but hey, it's the news, right? I'd also like to thank the fairgrounds for stating that they had no record of wither events even though I have email documentation that shows there was knowledge and wayne Petersen the contact at the fairgrounds called Tony's Kingdom and told him the event would not happen unless I paid a $10k deposit. Didn't bother calling me, mind you. Called Tony... My PayPal account really did get locked up. I can't even access it now. So PayPal steals close to $5k and I'm just fucked! My life is over. CCCC was all I had to live for. I was going to use the profits to get the craft fair people paid back, move myself and my wife to the beach to start a new life and now it's all gone. I have answered every message I've received and even though I have no way of paying people back I was trying to make sure that the artists and vendors would get an event to vend at and Salem would still have a good con to go to. I have documentation and proof of all of the above so if you witch hunting scavengers want it, just ask. All I can do is apologize. I have nothing else now. It's all gone. Oh, and John Rogers, fuck you."
For a long time we figured we were screwed. This is one of the darker sides I've learned about vendoring. People can and will just take off with your money. And there will be people to defend those asses too.
Thankfully there was a huge stroke of luck and a very ambitious young man took over the fiasco before it passed. John Roach took over the con. In 4 months he revived the con, spoke with many of the vendors and got them settled, managing to completely book all the vendor spaces, got in many celebrity guests that Mark didn't even bother trying to get, The list goes on.
I saw him quite a few times going around to various small craft fairs advertising the show. Thats how we met him the first time, at a small local craft show. One of those little grandma shows. I don't think I'd ever see Mark at anything like that. It was refreshing.
To me it shifted a lot of my hatred of the event. Before I met them I was fully willing to work the event because we were being forced to, but I was gonna wear a shirt blasting the event and let everyone know about the crap Mark had done. I'm not usually a justice warrior but this whole situation had me fuming for months.
So, I was blessedly thankful to meet John and talk with him. He happily took time to talk with us about how we had been treated and how it could be fixed. Then to see all the hard work he put into the con itself. Even at the con he was working hard and deserves a ton of praise and credit.
All I can say is thank you to John for rescuing this con and giving us another local Salem event. I look forward to any events you do in the future.
For the record this was never meant as a blast at Mark. I merely posted all this info to inform others of how cons can go sometimes.
And seriously, John, you were a life saver for that Con. Thank you for taking it over.
Everyone does them after some point of playing with those addicting little guns; either because a gun breaks down, or out of curiosity, or because a friend did it before and showed it off.
This week I'm only focusing on the painting of one, but you can go inside a nerf gun and mod the bejeebus out of their guts to make them fly faster, longer, hit harder, etc.
Painting a nerf gun is....well fairly simple.
Figure out a color theme. Do a base coat of black or white, or whatever you want your base color to be. Most of these are black. I have a plan for a white based one and a blue based one but that's i nthe future.
After that all it takes is fuguring out what colors will go where. I use P3 acrylic paints for painting small figures, but any acrylic works.
This key is a precise hand, and working slowly. Otherwise you get sloppy spots.
You will need: A nerf gun. Find one from goodwill. Thats where I got most of my bases.
Paints-Acrylic, and a base coat. I just used the cheapest spray paint i could find.
Paint brushes, etc
This was one of two I painted up for Dystopia Rising. (I kinda wish I had kept it. I really liked the design. Now I'm keeping an eye out for another of this type)
This was the second long rifle I painted. It comes in 4 parts. This is the middle secontion with the clip in.
The long rifle is all togethere here. I Think I was still adding touches here and there as I put it together to get the colors to flow better.
This was a bow I did a long time ago. One of the crappy rebel bows. I used a different type of paint, on that cracks and has texture because I wanted it to look old a rusty.
This one is to show that you need to make sure you get your base coat in all the nooks and crannies. I missed the bullet slots a bit and the orange showed through.
The roses and both of these were done by a friend who is an amazing artist.
Another smaller bow that never really got used unfortunately. The little sigils said somethign but I don't recall now. lol.
And finally the rifle I did for my husband. he played a strain called a Murican. As the name suggests they tend to be very...patriotic, annoying, lod, etc. Typical American really. They paint their stuff with the old red, white, and blue so his gun is a little...flamboyant
Overall, these can be very fun if you're just painting. Working on the inner guts can be very aggrivating if you're new to it. I lost a few guns when I firsted started.
Also to note!! All Nerf Guns Must have an Orange Tip as per the laws so that cops don't mistake them for real guns.
Feel free to always ask questions, comments, etc. I'm always up for a chat.
And never forget. If you don't try you won't find out if you can do something cool. Errors will happen. Don't fear them, just learn from them.
Hello Everyone! I'm so sorry I've been absent for so long. I hope you weren't waiting too long. There are tons of great bloggers for crafts out there.
However, today I'm doing a post on making molds. There are many different ways to do this, but I'm doing silicone ones.
This is one of the myriad of videos I followed to make my putty with.
https://www.youtube.com/watch?v=aElFs2XsOHo
A quick search on youtube will bring up many more. It's fine to use one you're more comfortable with.
My ingredients/tools are:
Dap silicone100% silicone. It has to be 100% or things go wrong
Corn starch and a binder
oil. veggie oil is suggested, but i used penut oil. seemed to work the same
a tub to mix them in
and a mixing implement.
Things to make molds of
some sort of coloring agent if you don't want them to be white.
Now then. first a formost wear GLOVES! This crap is sticky. I probably did this round wrong, severly wrong. I also got the wrong color of silicone.
If you look closely my molds are cracking. I don't know where it went wrong but the drying process went really fast. That's not good when you wanna make a lot of molds.
Overall this is going to be a few parts post. At least untill I get this right. Not everything works out the first or even second time.
So keep an eye out as i try again.
Comments, questions, advice are always welcome. :)
Sorry dear readers. It's been a rough start to the new year. My husband began a new job, a bunch of bills pilled up and have been taking their toll. The house is up for sale. I've been working small events that haven't brought in much. And the big event I was lookign forward to exploded. All of this didn't add u pto the doctor visit.
Yes, I went to a doctor.
The world blew up from there.
You see I haven't been to a medical facility in years. However my husband decided it was high time to do something cuz I was and am having a hard time focusing, had massive head aches, and terrible moodswings. And I"m not pregnant!
Thus something was off. I've always known something was off, but never worried about it. Long story short manic depressive with high spurts of manic.
Steps are taken.
In the mean time I said there would be horns.
Doing these is very very simple. It's just a lot of twisting and playing around. It's a great beginner craft for clay.
This is really just a quicky to show of the new dragon. I have a few blogs in the works, but things have been hectic here. This one is a lot lighter than the last ones as she has a tinfoil core. It really does help spread out your clay, especially when those bricks are rediculously expensive.
For any crafter we do what we do becuase we love it. However, I've run into many crafters over the years who say things like:
"I wish I had that skill."
"I wanna be able to do that ,but i just can't get it right."
"I wish I was like you."
Really the list goes on, but it comes back to the I wish, I want, You're so talented, You do so much. ETC.
As I state in many of my posts. The first trick to getting here is the drive. You want to...no need to make that neat thing. No matter what. You just have to get the vision out.
The next is to JUST DO IT!
No seriouesly, even if the first ,second third, fifth type fails, just do it till its right. I make a ton of first tries untill I finally make a good one. Failure is a fact of life. It's how we learn.
For instance. Last night I made shepards pie for the first time. I don't cook well. I tend to burn things or over salt them, or just get it wrong. Last night was a first try and while I didn't burn it or over salt it because i knew of those problems I also noted it was kind of bland. So next time, and there will be a next time, I'll add a bit more seasoning. maybe not salt, but maybe a little spice between each layer. I'll also cook it just abit longer as it was a tiny bit mushy still.
You won't learn anything without trying. It's that simple.
The next point to doing anything is half part masochism, and half part stubbornness. It goes back to the need to make that visions right. Bare in mind there's no such thing as perfect. If there was compters wouldn't break down after 10 years.
Honestly I can go on about this. But there's a youtube vidoe that covers this better. It's from one of my favorite creators. He inspired me to just jump in with armor I was trying to make back in this post.: http://kristelskreations.blogspot.com/2014/01/dystopia-rising-armor-pt-1.html
Had I not stumbled upon one of his first vidoes aroudn the time I was figureing out armor and clothing, I would never have tried making mine. Either way he covers what I've been saying from the beginnign the best. https://www.youtube.com/watch?v=gPqe1aNdYuU